Introduction
Welcome, fellow developers and enthusiasts, to a workshop that will illuminate the path to mastering one of the most powerful tools in the web automation arsenal – Puppeteer. Developed by Google, Puppeteer is more than just a library; it's a gateway to automating tasks, testing websites, and breathing life into your web projects.
Just as Git revolutionizes collaboration in the coding world, Puppeteer empowers developers to navigate the digital landscape with precision and finesse. With Puppeteer as your companion, you'll embark on a journey where virtual pages become your canvas, and scripts wield the power to interact with web elements, simulate user actions, and extract valuable insights.
Throughout this workshop, we'll dive into the intricacies of Puppeteer, unraveling its capabilities, exploring practical use cases, and equipping you with the skills to wield this tool effectively. Whether you're a seasoned developer or a curious novice, Puppeteer offers a gateway to a world where automation is not just a convenience but a game-changer.
As promised, we'll look into ways of finding rent in Cluj Napoca in a more efficient way. So, get ready to dive into the world of Puppeteer, where lines of code become puppet strings, and the web transforms into your stage. Let's embark on this journey together, where every click, every scroll, and every interaction is powered by the magic of Puppeteer. Your apartment in Cluj Napoca awaits!
All the solutions are available here: Puppeteer Workshop Solutions
What is Puppeteer?
Puppeteer is a Node.js library which provides a high-level API to control Chrome/Chromium over the DevTools Protocol. While it's primarily used for automating web tasks, Puppeteer can also be used for web scraping, testing, and creating snapshots of web pages.
Features
Most things that you can do manually in the browser can be done using Puppeteer! Here are a few examples to get you started:
- Automate form submission, UI testing, keyboard input, etc.
- Create an automated testing environment using the latest JavaScript and browser features.
- Capture a timeline trace of your site to help diagnose performance issues.
- Generate screenshots and PDFs of pages.
- Crawl a SPA (Single-Page Application) and generate pre-rendered content (i.e. "SSR" (Server-Side Rendering)).
Getting Started
Installation
To use Puppeteer in your project, run:
npm install puppeteer
# or
yarn add puppeteer
# or
pnpm add puppeteer
When you install Puppeteer, it automatically downloads a recent version of Chrome for Testing (~170MB macOS, ~282MB Linux, ~280MB Windows) and a chrome-headless-shell binary that is guaranteed to work with Puppeteer. The browser is downloaded to the $HOME/.cache/puppeteer folder by default
Inside the project folder, you will find a node_modules directory containing the Puppeteer package and a package-lock.json file that lists the dependencies and versions used in the installation. In package.json, add "type": "module" to enable ES modules in your project.
Running the code
Assuming the file is named index.js, you can run the code using the following command:
node index.js
Core Concepts
1. Browser and Page
At the heart of Puppeteer lies the concept of a browser and a page. The browser represents the Chrome or Chromium instance controlled by Puppeteer, while the page represents a single tab within that browser instance. Think of the browser as your window to the internet, and each page as a separate document or website within that window.
2. Selectors
Selectors are a fundamental aspect of web automation, allowing you to pinpoint and interact with specific elements on a web page. Puppeteer leverages various types of selectors, including:
- CSS Selectors: Utilize CSS syntax to target elements based on their attributes, classes, or relationships with other elements.
- XPath Selectors: Employ XPath expressions to locate elements by their position in the HTML document tree.
- DOM Selectors: Interact with elements using their unique IDs, names, or other properties within the Document Object Model (DOM).
Understanding selectors is crucial for navigating and manipulating web pages effectively with Puppeteer. They serve as the building blocks for automating interactions such as clicking buttons, inputting text, or extracting data from specific elements.
Browser management
Usually, you start working with Puppeteer by launching a browser instance. This browser instance is controlled by Puppeteer and can be used to open new tabs, navigate to different URLs, interact with web pages, and perform various tasks.
Launching a Browser
import puppeteer from "puppeteer";

const browser = await puppeteer.launch();

const page = await browser.newPage();
When launching a browser, you can specify various options to customize its behavior. These options include:
headless: A boolean value that determines whether the browser should run in headless mode (without a visible UI). By default, this option is set totrue.slowMo: A number that introduces a delay (in milliseconds) between Puppeteer actions. This can be useful for debugging or observing the automation process.defaultViewport: An object that defines the initial browser window size and scale factor. This can be useful for ensuring consistent rendering across different devices.args: An array of strings that specify additional command-line arguments to pass to the browser instance. These arguments can modify the browser's behavior or enable specific features.- and more...
const browser = await puppeteer.launch({
  headless: false,
  slowMo: 250,
  defaultViewport: null,
  args: ["--start-maximized"],
});
Closing the Browser
Once you're done working with the browser, you should close it to free up system resources. You can close the browser instance using the browser.close() method.
import puppeteer from "puppeteer";

const browser = await puppeteer.launch();

const page = await browser.newPage();

await browser.close();
Page interactions
In this section, we will learn how to interact with a page using Puppeteer. Puppeteer provides a high-level API to interact with a page, which includes navigating to a page, clicking on elements, typing text, and more. All the functions are asynchronous and return promises, which makes it easy to work with Puppeteer in an asynchronous manner. There are many methods available to interact with a page, and we will cover some of the most common ones, but you can find the full list in the official documentation.
Navigating to a Page
To navigate to a page, you can use the page.goto() method. This method takes a URL as an argument and loads the page at the specified URL.
import puppeteer from "puppeteer";

(async () => {
  const browser = await puppeteer.launch();
  const page = await browser.newPage();

  await page.goto("https://www.example.com");

  await browser.close();
})();
In the example above, we launch a browser instance, create a new page, and navigate to https://www.example.com. Once the page is loaded, we close the browser.
Taking Screenshots
You can take a screenshot of a page using the page.screenshot() method. This method captures a screenshot of the current page and saves it to a file, to the specified path.
import puppeteer from "puppeteer";

(async () => {
  const browser = await puppeteer.launch();
  const page = await browser.newPage();

  await page.goto("https://www.example.com");
  await page.screenshot({ path: "example.png", fullPage: true });

  await browser.close();
})();
Generating PDFs
You can generate a PDF of a page using the page.pdf() method. This method generates a PDF of the current page and saves it to a file, to the specified path.
import puppeteer from "puppeteer";

(async () => {
  const browser = await puppeteer.launch();
  const page = await browser.newPage();

  await page.goto("https://www.example.com");
  await page.pdf({ path: "example.pdf", format: "A4" });

  await browser.close();
})();
The magic of Puppeteer lies in its ability to evaluate JavaScript on a page. Based on DOM manipulation, you can interact with elements, click buttons, and more. The core concepts is based on the selectors and the actions you want to perform. There are different methods to evaluate the content of a page:
Evaluating JavaScript
page.$(selector): This method returns the first element that matches the specified selector. If no element matches the selector, the method returnsnull.page.$$(selector): This method returns an array of elements that match the specified selector. If no elements match the selector, the method returns an empty array.page.$eval(selector, pageFunction, ...args): This method evaluates the specified function in the context of the first element that matches the selector. The function can access the DOM of the element and return a value. The arguments passed to the function are serialized and can be accessed as function parameters.page.evaluate(pageFunction, ...args): This method evaluates the specified function in the context of the page. The function can access the DOM of the page and return a value. The arguments passed to the function are serialized and can be accessed as function parameters.
When evaluating JavaScript on a page, you can interact with elements, get their attributes, and perform various actions. This allows you to automate tasks, scrape data, and test web applications.
import puppeteer from "puppeteer";

const selector = ".selector";
const textSelector = ".text-selector";

(async () => {
    const browser = await puppeteer.launch();
    const page = await browser.newPage();
    await page.goto("https://www.example.com");

    const element = await page.$(selector); // Get the first element that matches the selector
    const elements = await page.$$(selector); // Get all elements that match the selector

    let value = await page.$eval(selector, (element) => {
        return element..innerText;
    });

    value = await page.evaluate((selector) => {
        return document.querySelector(selector).textContent;
    }, selector);

    const text = await element.evaluate((el) => el.textContent); // Get the text content of the element
})();
Waiting for Elements
When interacting with a page, it's important to wait for elements to be available before performing actions on them. Puppeteer provides the page.waitForSelector() method to wait for an element to be present in the DOM. By default, this method waits for 30 seconds before timing out, but you can specify a custom timeout using the timeout option.
import puppeteer from "puppeteer";

const selector = ".selector";

(async () => {
  const browser = await puppeteer.launch();
  const page = await browser.newPage();
  await page.goto("https://www.example.com");

  await page.waitForSelector(selector, { timeout: 5000 });

  await browser.close();
})();
Also, it's advisable to insert some delay before performing actions on the page. This can be done creating a delay function and using it before performing actions.
function delay(time) {
  return new Promise(function (resolve) {
    setTimeout(resolve, time);
  });
}

(async () => {
  const browser = await puppeteer.launch();
  const page = await browser.newPage();
  await page.goto("https://www.example.com");

  await delay(2000); // Wait for 2 seconds

  await browser.close();
})();
Clicking on Elements
To click on an element on a page, you can use the element.click() method. This method simulates a mouse click on the element. While this method seems pretty straightforward, in some cases, the element might not be completely visible or clickable, that's why it's more recommended to use the evaluation methods mentioned above.
import puppeteer from "puppeteer";

const selector = ".selector";

(async () => {
  const browser = await puppeteer.launch();
  const page = await browser.newPage();
  await page.goto("https://www.example.com");

  await page.waitForSelector(selector);

  const element = await page.$(selector);

  await element.click();

  // safer approach
  await element.evaluate((el) => el.click());

  await browser.close();
})();
Typing Text
For input fields, you can use the element.type() method to type text into the field. This method simulates typing text on the keyboard and is useful for automating form submissions, login processes, and more.
import puppeteer from "puppeteer";

const selector = ".selector";

(async () => {
  const browser = await puppeteer.launch();
  const page = await browser.newPage();
  await page.goto("https://www.example.com");

  await page.waitForSelector(selector);

  const element = await page.$(selector);

  await element.type("Hello, World!");

  await browser.close();
})();
Setting up constants
Welcome to the first chapter of the Web Scraping section! In this section, we will find all the anouncements listed on OLX for the apartments in Cluj-Napoca. We will use Puppeteer to scrape the data from the website and save it to a JSON file, for easier analysis.
In this chapter, we will set up the constants that we will use throughout the project. These constants will help us maintain consistency and readability in our code. We will define the URLs we want to scrape, the selectors we want to target, and other configuration options. Let's get started!
To begin with, we'll analyze the website, and identify the structure of the page.
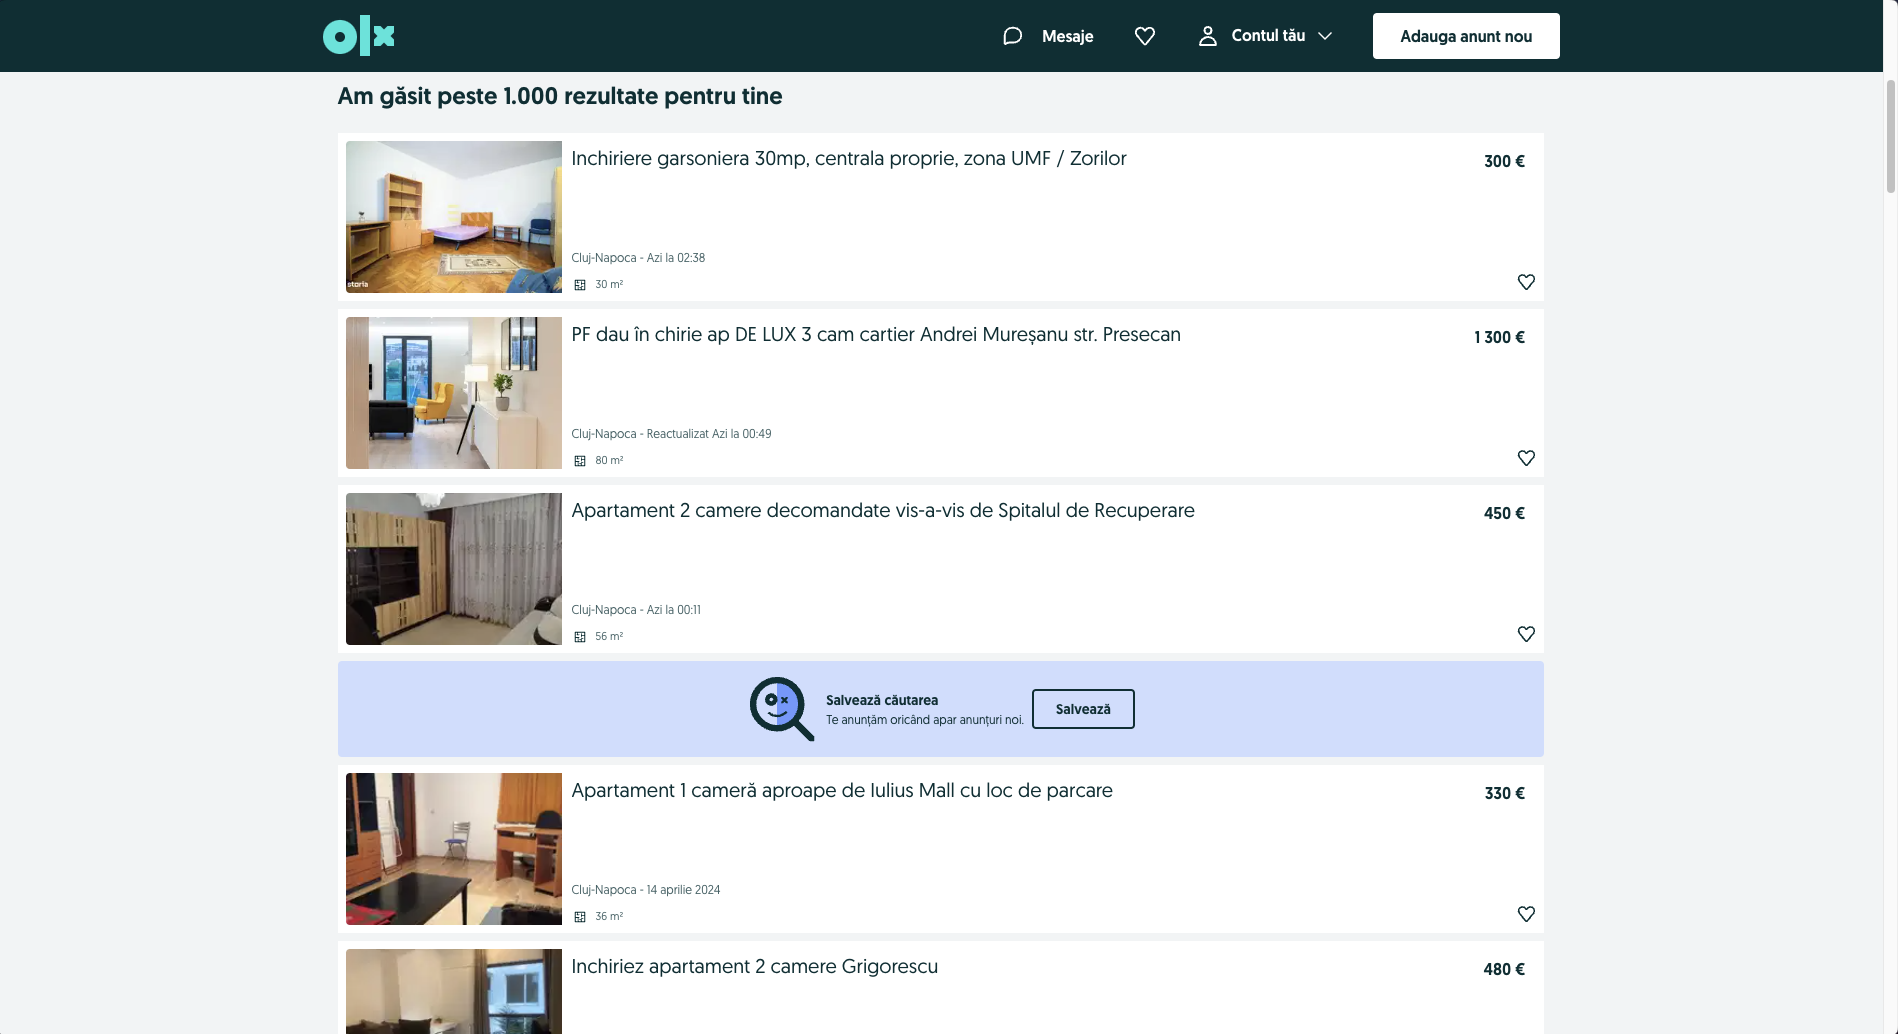
We can see that the website has a list of announcements for apartments in Cluj-Napoca. Each announcement has a title, a price, a location (always Cluj Napoca), a surface area, an image, and an url. For each unique aspect of the announcement, we will try to identify the corresponding selector.
import puppeteer from "puppeteer";

const URL =
  "https://www.olx.ro/imobiliare/apartamente-garsoniere-de-inchiriat/cluj-napoca/?currency=EUR";

// the values of the selectors are just placeholders, we will update them live during the workshop
const SELECTORS = {
  ANNOUNCEMENT: ".offer-wrapper",
  TITLE: ".offer-title",
  PRICE: ".price",
  SURFACE: ".surface",
  URL: ".url",
  IMAGE: ".image",
};
In the code snippet above, we have defined the URL of the OLX page we want to scrape and the selectors for the different aspects of the announcement. We will use these constants in the subsequent chapters to scrape the data from the website.
Launching the browser
Now that we have set up the constants, we can proceed to launch the browser and navigate to the OLX page. We will use Puppeteer to automate this process. Let's write the code to launch the browser and navigate to the OLX page.
async function run() {
  const browser = await puppeteer.launch();
  const page = await browser.newPage();

  await page.goto(URL);

  await browser.close();
}
In the code snippet above, we have defined an async function called run that launches the browser and navigates to the OLX page. We will call this function in the subsequent chapters to scrape the data from the website. The run function will be the entry point for our web scraping project, and we will build upon it in the upcoming chapters.
Retrieving data
Now, we want to retrieve all the announcements from the page. For each announcement, we will extract the title, price, and surface.
If we look carefully at all the annoucements, we can see that not all contain information about the surface. If we access an annoucement that does not contain the surface, we will get an error (puppeteer errors are worse than C Compiler Messages). For the surface, we will wrap everything in a try-catch block, and if we get an error, we will just set the surface to "N/A".
// continue from the previous code snippet, after page.goto(URL)
const data = [];

await page.waitForSelector(SELECTORS.ANNOUNCEMENT);

const announcements = await page.$$(SELECTORS.ANNOUNCEMENT);

for (const announcement of announcements) {
  let surface = "N/A";

  const title = await announcement.$eval(
    SELECTORS.TITLE,
    (el) => el.textContent
  );
  const price = await announcement.$eval(
    SELECTORS.PRICE,
    (el) => el.textContent
  );
  try {
    surface = await announcement.$eval(
      SELECTORS.SURFACE,
      (el) => el.textContent
    );
  } catch (e) {
    // do nothing
  }

  const imagePath = await announcement.$eval(SELECTORS.IMAGE, (el) => el.src);

  const url = await announcement.$eval(SELECTORS.URL, (el) => el.href);

  data.push({
    title: title,
    price: price,
    surface: surface,
    image: imagePath,
    url: url,
  });
}
Alright! We have successfully retrieved the data from the first page. But there are a lot more pages to scrape, and with the rate of rentals in Cluj, even the announcement from the last page are at most 2 weeks old. We will need to navigate to the next page and retrieve the data from there as well.
Navigation to another page
OLX paginates data. We will need to navigate to the next page and retrieve the data from there as well. At the bottom of the page, there is an arrow that moves to the next page. Inside the arrow, there is an anchor tag that we can click to navigate to the next page, for which we'll want to retrieve the url. Furthermore, on the last page, the arrow does not exist, so this is a good way to check if we still have pages to scrape.
First step is to update the selectors with the new ones.
const SELECTORS = {
  ANNOUNCEMENT: ".offer-wrapper",
  TITLE: ".offer-title",
  PRICE: ".price",
  SURFACE: ".surface",
  URL: ".url",
  IMAGE: ".image",
  NEXT_PAGE: ".pager .next a",
};
Next, we need a cycle to navigate through all the pages. We will use a while loop to navigate to the next page until the "Next" button is no longer available.
while (true) {
  console.log("Scraping page " + page.url());
  // code is exactly the same as before

  // navigate to the next page
  // since the element might not be available, we will wrap it in a try-catch block
  try {
    const nextPageURL = await page.$eval(SELECTORS.NEXT_PAGE, (el) => el.href);
    await page.goto(nextPageURL);
  } catch (e) {
    console.log(e);
    break;
  }
}
Cool! Now we have all the data from all the pages. We can save it to a JSON file for further analysis.
Saving the data
Finally, we will save the data to a JSON file. We will use the fs module to write the data to a file named data.json.
// at the beginning of the file
import fs from "fs";

async function run() {
  // code to scrape the data

  fs.writeFile("data.json", JSON.stringify(data), (err) => {
    if (err) throw err;
    console.log("File Saved");
  });

  await browser.close();
}
That's it! We have successfully set up the constants, launched the browser, retrieved the data, navigated to the next page, and saved the data to a JSON file.
Exercise: Web Scraping
Congrats! You have successfully completed the web scraping demo. Now it's time to put your skills to the test.
Objective
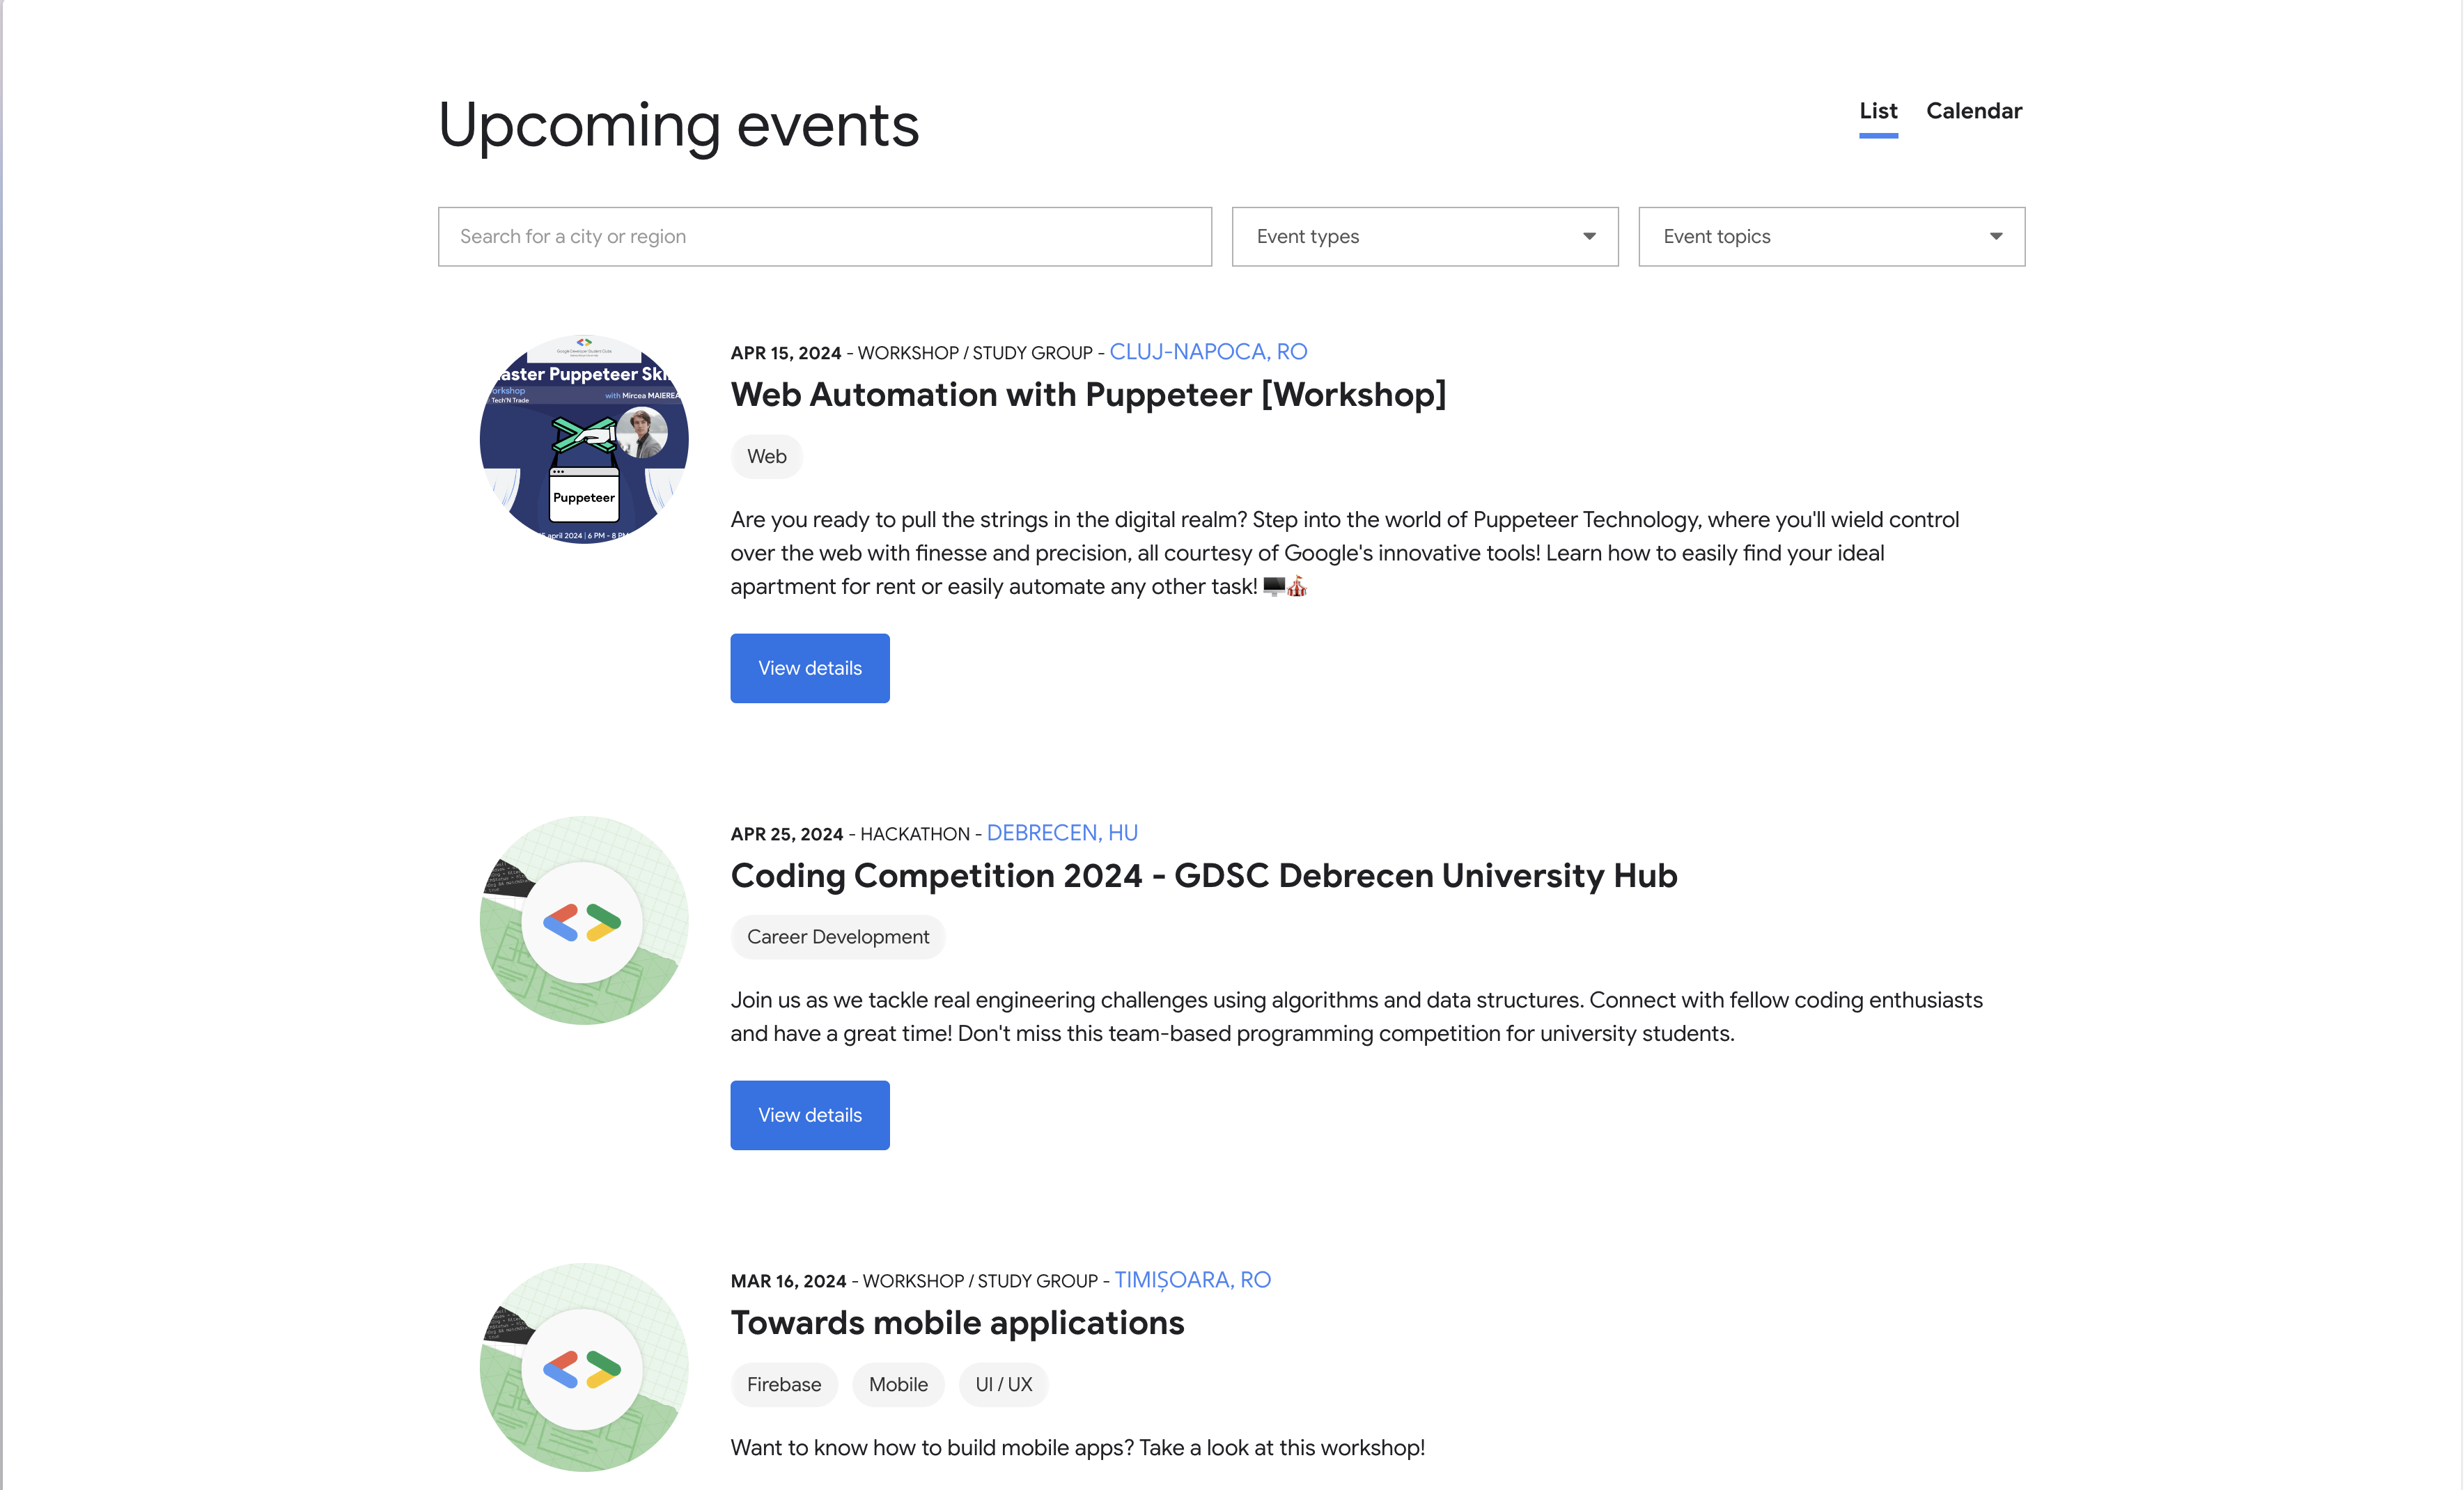
You are the biggest GDSC fan, and you want to attend as many workshops as possible. You are able to go anywhere in the world, so the location is not a problem. For this, you want to scrape the GDSC events from the GDSC website. For each event, you want to extract the title, date, location, description, image link, the tags associated with the event, and the url
Steps
Before we begin writing the code, let's analyze the website and identify the structure of the page. We can see that the website has a list of upcoming events. Each event has a title, a date, a location, a description, an image, and tags. For each unique aspect of the event, we will try to identify the corresponding selector.
An event can have multiple tags that should be stored in an array.
At the bottom of the page, we have a button that loads more events, so no navigation is required. We see that if we click it multiple times, we can load all the events. Consider having all the events loaded before scraping the data.
Demo: Web Automation
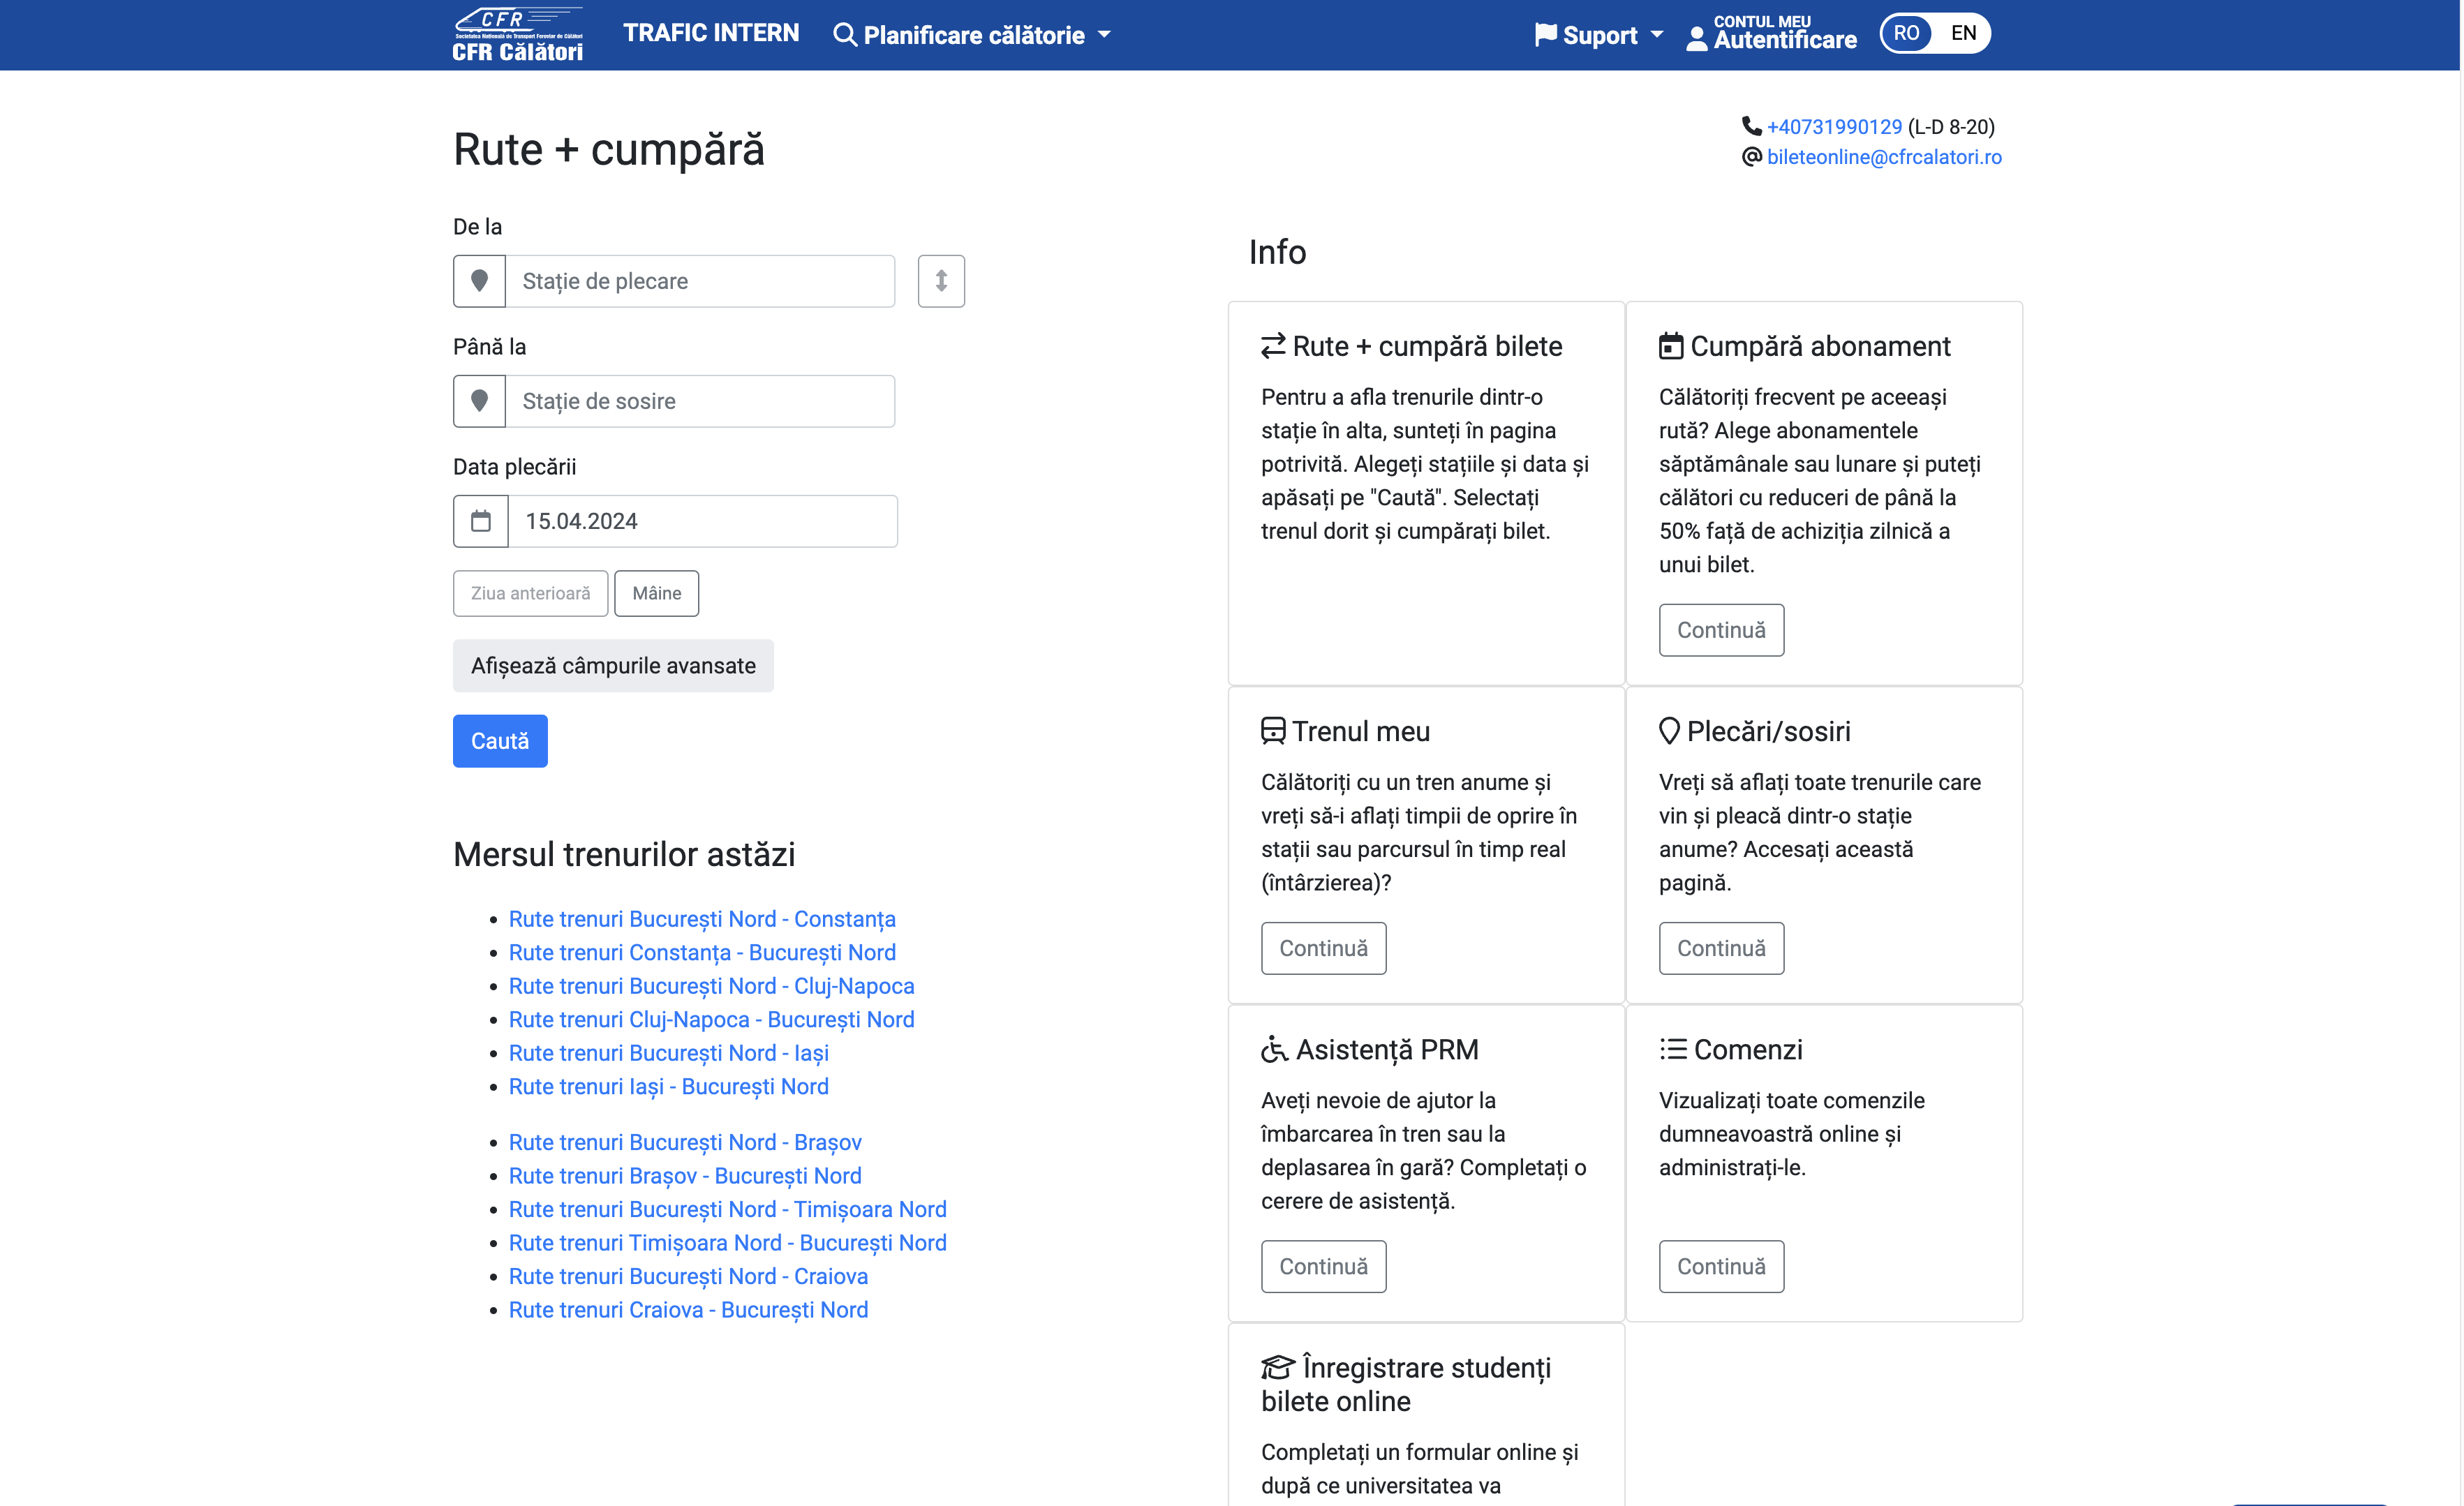
Automations are a great way to save time and effort for repetitive tasks. In this demo, we will automate the process of purchasing a train ticket using Puppeteer. We will navigate to the CFR website, search for a train, and book a ticket.
For this demo, we will be using the advanced search feature available on the website. It allows us to sort the data based on various parameters like the duration of the journey, the departure time, and the arrival time.
Criteria
We will search for a train from Cluj-Napoca to Bucharest. We will filter the results based on the following criteria:
- The journey duration should be as short as possible.
- The departure time should be after 8:00 AM.
Journey Details
To make things easier, we'll complete the form in the website. The generated link is
https://bilete.cfrcalatori.ro/ro-RO/Rute-trenuri/Cluj-Napoca/Bucuresti-Nord?DepartureDate=20.04.2024&MinutesInDay=480&OrderingTypeId=2
We can observe that:
- In the url, we have the departure and arrival stations
- We have a parameter for the departure date, represented in the format dd.mm.yyyy
- We have a parameter for the time, represented in minutes since midnight. For example, 480 minutes is 8:00 AM, 720 minutes is 12:00 PM, and so on.
- We have a parameter for the ordering type, which in our case is 2, meaning that we want to sort the results by the duration of the journey.
We can extract those values as parameters in our script and generate the link dynamically, thus allowing us to buy tickets for multiple dates, times, and stations.
import puppeteer from "puppeteer";

const JOURNEY = {
  DEPARTURE: "Cluj-Napoca",
  ARRIVAL: "Bucuresti-Nord",
  DEPARTURE_DATE: "20.04.2024",
  DEPARTURE_TIME: 480,
  ORDERING_TYPE: 2,
};

const URL = `https://bilete.cfrcalatori.ro/ro-RO/Rute-trenuri/${JOURNEY.DEPARTURE}/${JOURNEY.ARRIVAL}?DepartureDate=${JOURNEY.DEPARTURE_DATE}&MinutesInDay=${JOURNEY.DEPARTURE_TIME}&OrderingTypeId=${JOURNEY.ORDERING_TYPE}`;
In the code snippet above, we have defined the journey details and the URL for the search. We will use these constants in the subsequent chapters to automate the process of purchasing a train ticket. These can be easily modified to search for different journeys based on an user input.
Selectors
Like in the previous chapters, we will define the selectors for the different elements on the page. We will use these selectors to interact with the page and extract the necessary information.
At a first glance, we see that we need selectors to interact with the following elements:
- Panels for the train
- Button to book the ticket
There will be more selectors updated later in the chapter.
const SELECTORS = {
  TRAIN_PANEL: ".train-panel",
  BOOK_BUTTON: ".book-button",
};
Delay function
In an automation, we'll interact directly with the elements, so we need to ensure that they are completely loaded before we interact with them. We can use a delay function to wait for a specified amount of time before proceeding with the next action.
function delay(time) {
  return new Promise(function (resolve) {
    setTimeout(resolve, time);
  });
}
In the code snippet above, we have defined a delay function that returns a promise which resolves after the specified amount of time. We will use this function to wait for the elements to load before any interaction.
Launching the browser
For better visualization, we will use the headless: false option to see the browser in action.
async function run() {
  const browser = await puppeteer.launch({
    headless: false,
    defaultViewport: null,
    args: ["--start-maximized"],
  });
  const page = await browser.newPage();

  await page.goto(URL);
}
Selecting the train
In this exercise, we will select the first train from the list, since it is the one with the shortest journey duration. We will click on the "Cumpără" button to proceed with the booking.
Disclaimer: There should be some extra checks, to ensure that the train is not too early or too late, but for the sake of simplicity, we will assume that the first train is the best one.
We will write a new function
async function selectTrain(page) {
  await page.waitForSelector(SELECTORS.TRAIN_PANEL);

  const train = await page.$(SELECTORS.TRAIN_PANEL);

  await train.waitForSelector(SELECTORS.BUY_BUTTON);
  await delay(2000);

  const buyButton = await train.$(SELECTORS.BUY_BUTTON);
  await buyButton.evaluate((button) => button.click());
}

async funcion run()
{
    // previous code
    await selectTrain(page);
}
Ticket type
Now, we are redirected to another page, where we can select the type of ticket we want to buy. We're happy with the default selection, so we will click on "Pasul următor", to proceed with the booking.
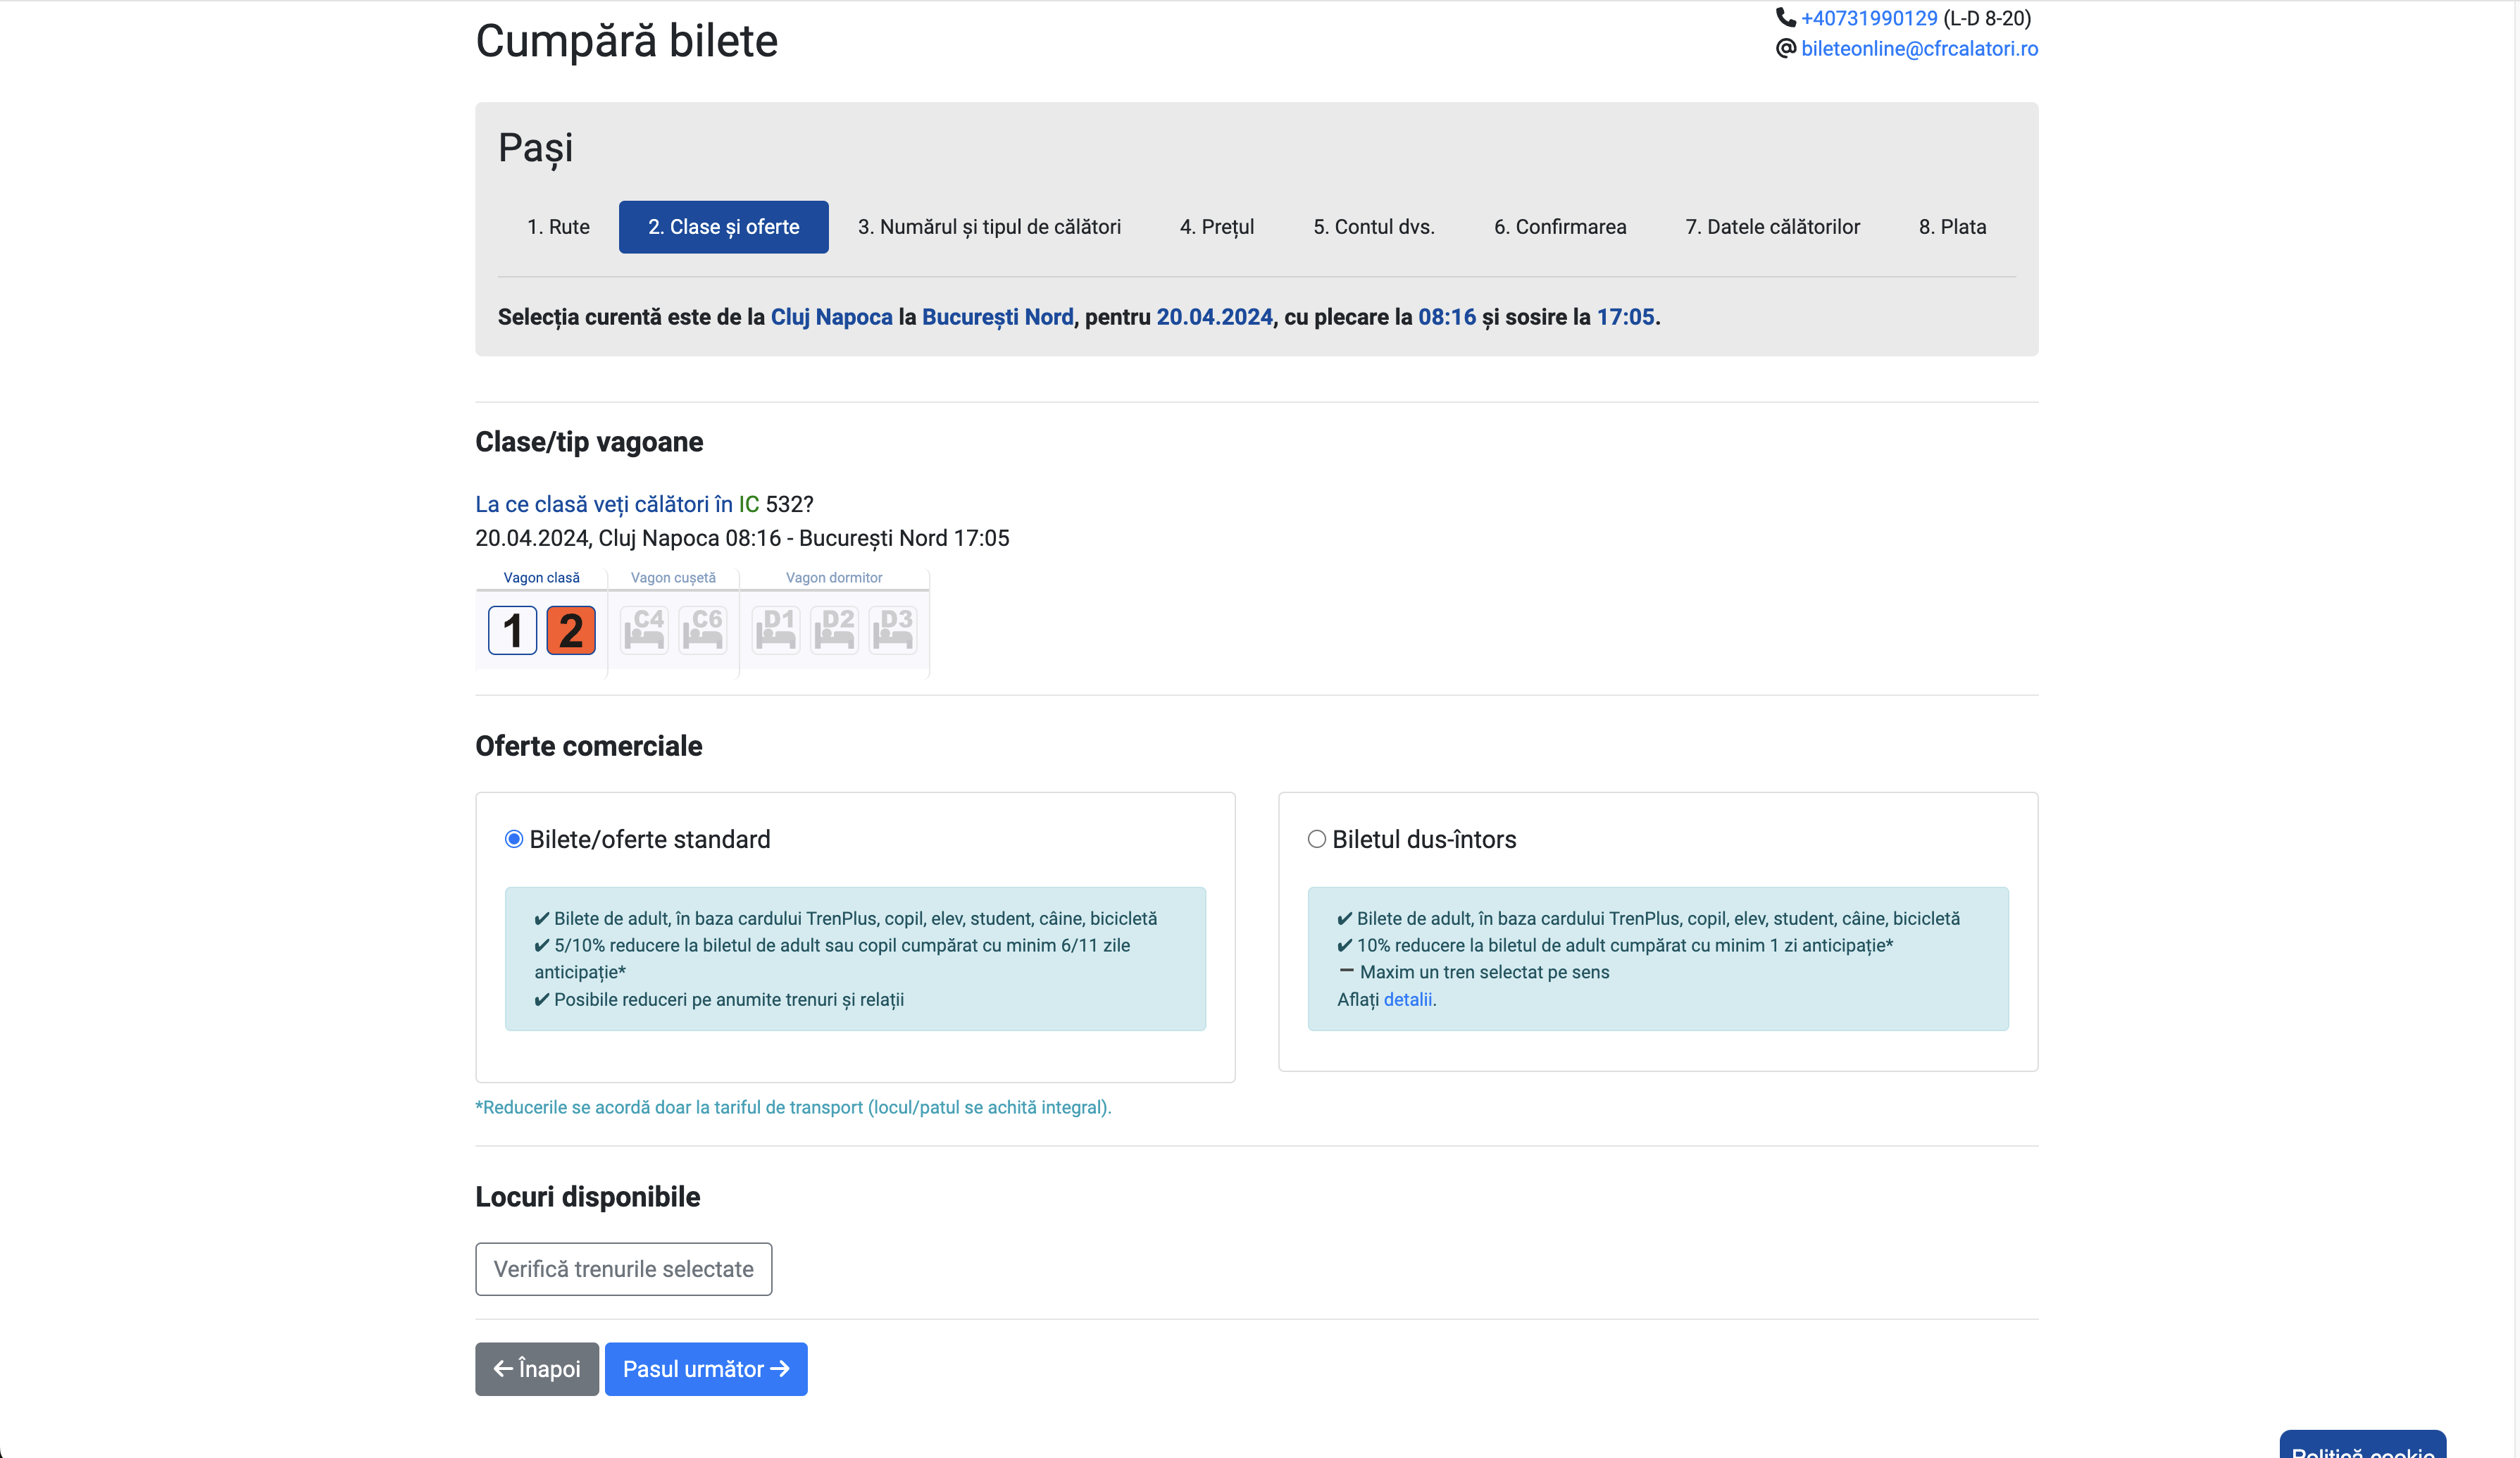
const SELECTORS = {
  // previous selectors
  TICKET_TYPE_NEXT_BUTTON: ".next-button",
};

async function selectTicketType(page) {
  await page.waitForSelector(SELECTORS.TICKET_TYPE_NEXT_BUTTON);

  await delay(2000);
  const nextButton = await page.$(SELECTORS.TICKET_TYPE_NEXT_BUTTON);
  await nextButton.evaluate((button) => button.click());
}

async function run() {
  // previous code
  await selectTicketType(page);
}
Number of tickets
On the third step, we need to select the number of tickets we want to purchase. We have 2 options: Either we write the value corresponding to the number of tickets we want to buy, or we click on the "+" button to increase the number of tickets. We will choose the second option.
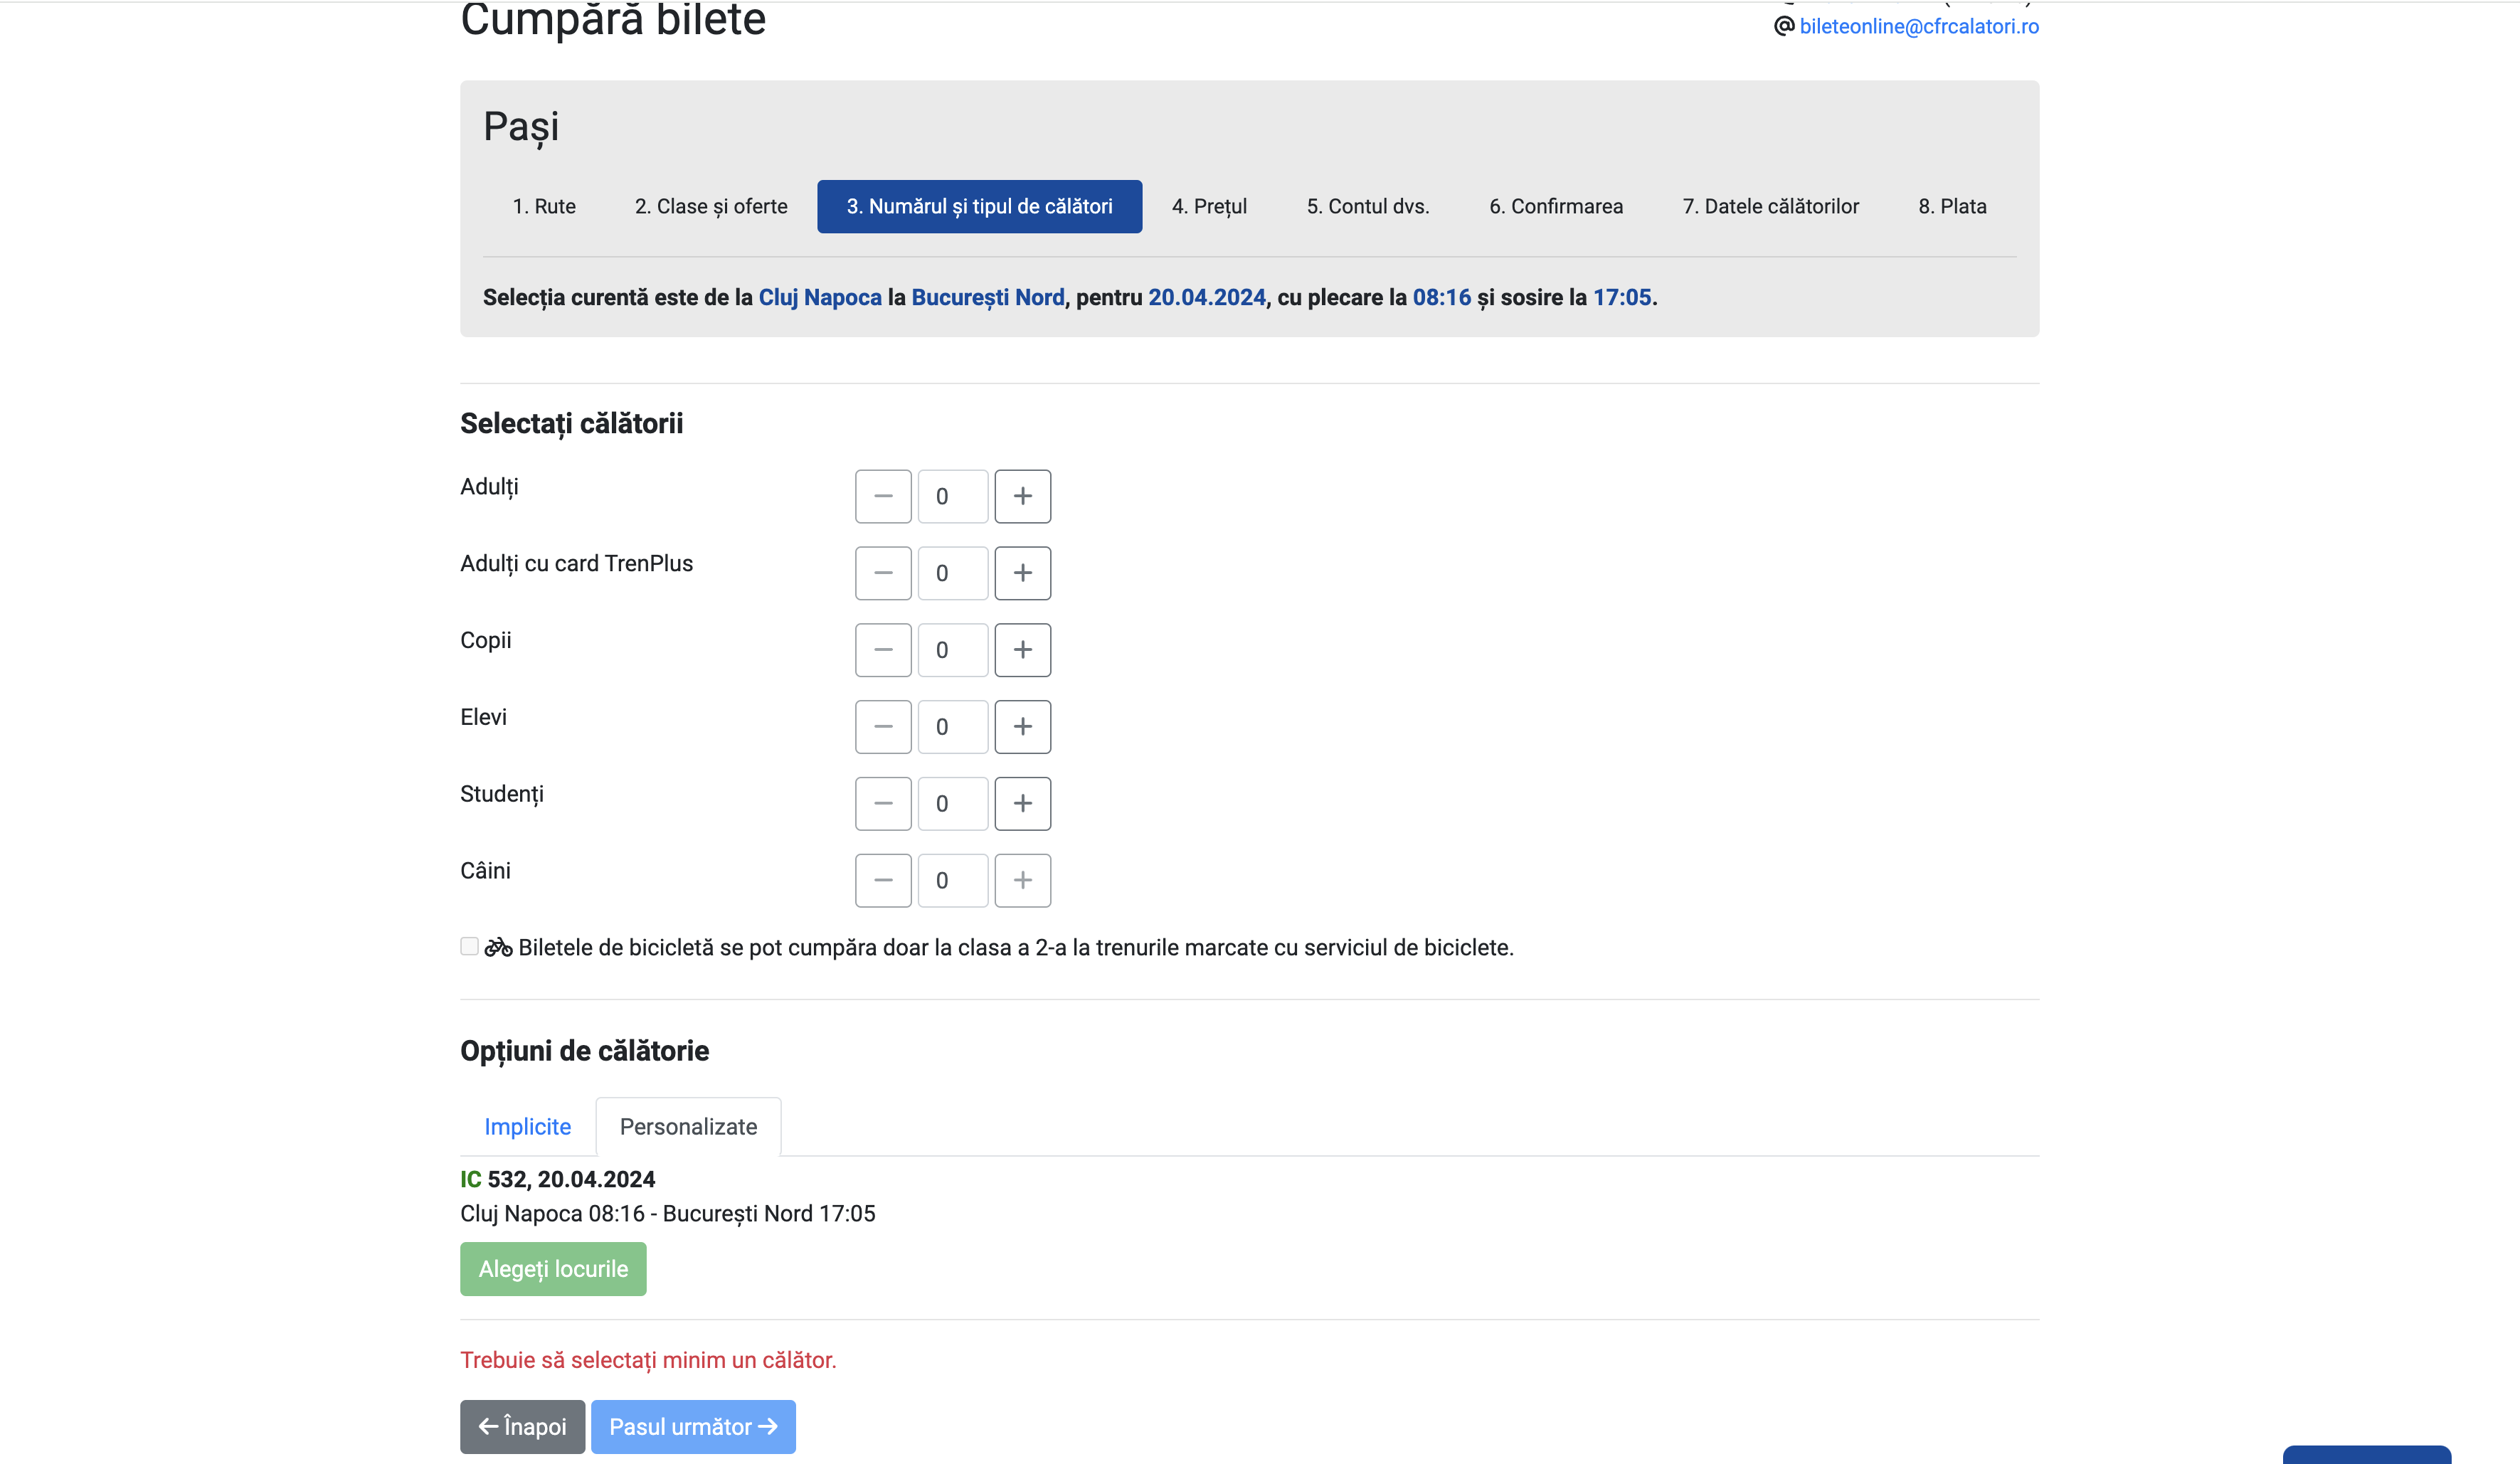
We can see that, after we click on the "+" button, a modal will appear, where we need to confirm something. We'll click on the "Am înțeles" button to proceed.
const SELECTORS = {
  // previous selectors
  TICKET_NUMBER_PLUS_BUTTON: ".plus-button",
  TICKET_NUMBER_POPUP_BUTTON: ".popup-button",
  TICKET_NUMBER_NEXT_BUTTON: ".next-button",
};

async function selectTicketNumber(page) {
  await page.waitForSelector(SELECTORS.TICKET_NUMBER_PLUS_BUTTON);

  await delay(2000);
  const plusButton = await page.$(SELECTORS.TICKET_NUMBER_PLUS_BUTTON);
  await plusButton.evaluate((button) => button.click());

  await page.waitForSelector(SELECTORS.TICKET_NUMBER_POPUP_BUTTON, {
    visible: true,
  });
  const popupButton = await page.$(SELECTORS.TICKET_NUMBER_POPUP_BUTTON);
  await popupButton.evaluate((button) => button.click());

  await page.waitForSelector(SELECTORS.TICKET_NUMBER_NEXT_BUTTON);
  await delay(2000);
  const nextButton = await page.$(SELECTORS.TICKET_NUMBER_NEXT_BUTTON);
  await nextButton.evaluate((button) => button.click());
}

async function run() {
  // previous code
  await selectTicketNumber(page);
}
Price
Probably the easiest step, we just need to click on the "Pasul următor" button to proceed.
const SELECTORS = {
  // previous selectors
  PRICE_NEXT_BUTTON: ".next-button",
};

async function selectPrice(page) {
  await page.waitForSelector(SELECTORS.PRICE_NEXT_BUTTON);

  await delay(2000);
  const nextButton = await page.$(SELECTORS.PRICE_NEXT_BUTTON);
  await nextButton.evaluate((button) => button.click());
}

async function run() {
  // previous code
  await selectPrice(page);
}
Login
Before purchasing the ticket, we need to login. Those will be set up as constants in the script. For this step, we need to target the username and password fields, and the login button. We will use the type function to fill in the fields. After we login, we will click on the "Pasul următor" button to proceed.

const USER_DETAILS = {
  USERNAME: "your_username",
  PASSWORD: "your_password",
};

const SELECTORS = {
  // previous selectors
  USERNAME_FIELD: "#usernameId",
  PASSWORD_FIELD: "#passwordId",
  LOGIN_BUTTON: ".login-button",
  YOUR_ACCOUNT_NEXT_BUTTON: ".next-button",
};

async function login(page) {
  await page.waitForSelector(SELECTORS.USERNAME_FIELD);
  await page.type(SELECTORS.USERNAME_FIELD, USER_DETAILS.USERNAME, {
    delay: 100,
  });

  await page.waitForSelector(SELECTORS.PASSWORD_FIELD);
  await page.type(SELECTORS.PASSWORD_FIELD, USER_DETAILS.PASSWORD, {
    delay: 100,
  });

  await page.waitForSelector(SELECTORS.LOGIN_BUTTON);
  const loginButton = await page.$(SELECTORS.LOGIN_BUTTON);
  await loginButton.evaluate((button) => button.click());

  await page.waitForSelector(SELECTORS.YOUR_ACCOUNT_NEXT_BUTTON);
  await delay(2000);
  const nextButton = await page.$(SELECTORS.YOUR_ACCOUNT_NEXT_BUTTON);
  await nextButton.evaluate((button) => button.click());
}

async function run() {
  // previous code
  await login(page);
}
Confirm Selection
On this step, we need to confirm our selection. After clicking, we will click on the "Pasul următor" button to proceed. Until we confirm, we will not be able to proceed. For this, we'll use a function we did not mention before, the waitForFunction function.

const SELECTORS = {
  // previous selectors
  CONFIRM_SELECTION_BUTTON: ".confirm-button",
  CONFIRM_SELECTION_NEXT_BUTTON: ".next-button",
};

async function confirmBooking(page) {
  try {
    await page.waitForSelector(SELECTORS.CONFIRM_BUTTON, {
      visible: true,
      timeout: 5000,
    });
    const confirmButton = await page.$(SELECTORS.CONFIRM_BUTTON);
    await confirmButton.evaluate((el) => el.click());
  } catch (error) {
    console.log("No confirm button");
  }

  console.log("Selection confirmed");
  await page.waitForFunction(
    (selector) => {
      const button = document.querySelector(selector);
      return button && !button.disabled;
    },
    { polling: "mutation" },
    SELECTORS.CONFIRM_NEXT_BUTTON,
  );

  await page.waitForSelector(SELECTORS.CONFIRM_NEXT_BUTTON);
  await delay(2000);
  const nextButton = await page.$(SELECTORS.CONFIRM_NEXT_BUTTON);
  await nextButton.evaluate((button) => button.click());
}

async function run() {
  // previous code
  await confirmBooking(page);
}
What does waitForFunction do? It waits for a function to return a truthy value. In our case, we are waiting for the confirm button to be enabled. We are using the polling option to check the condition every time the DOM is mutated. This is useful when we are waiting for an element to change its state.
Travel Data
Thanks to the generosity of the Romanian Government, we have 90% discount for students. For this, we need to have the student card details linked to the account. In this sections, we can select from our preferences the student card, being the last step required to purchase the ticket.
When we click to select the student card, a modal will appear, where we need to confirm our selection. There can be multiple student cards, so we need to select the first one. After we confirm, we will click on the "Spre plată" button to proceed.

const SELECTORS = {
  // previous selectors
  TRAVEL_DATA_PREFERENCES: ""
  SELECT_PASSENGER_PREFERENCES: "",
  TRAVEL_DATA_NEXT_BUTTON: "",
};

async function selectStudentCard(page) {
  await page.waitForSelector(SELECTORS.TRAVEL_DATA_PREFERENCES);
  const travelDataPreferences = await page.$(SELECTORS.TRAVEL_DATA_PREFERENCES);
  await travelDataPreferences.evaluate((button) => button.click());

  await delay(2000);

  await page.waitForSelector(SELECTORS.SELECT_PASSENGER_PREFERENCES);
  const selectPassengerPreferences = await page.$(
    SELECTORS.SELECT_PASSENGER_PREFERENCES
  );
  await selectPassengerPreferences.evaluate((button) => button.click());

  await delay(2000);

  await page.waitForSelector(SELECTORS.TRAVEL_DATA_NEXT_BUTTON);
  const travelDataNextButton = await page.$(SELECTORS.TRAVEL_DATA_NEXT_BUTTON);
  await travelDataNextButton.evaluate((button) => button.click());
}

async function run() {
  // previous code
  await selectStudentCard(page);
}
We're finally at the payment step. For this, we'll use fake data, since we're not actually going to buy the ticket.
Payment
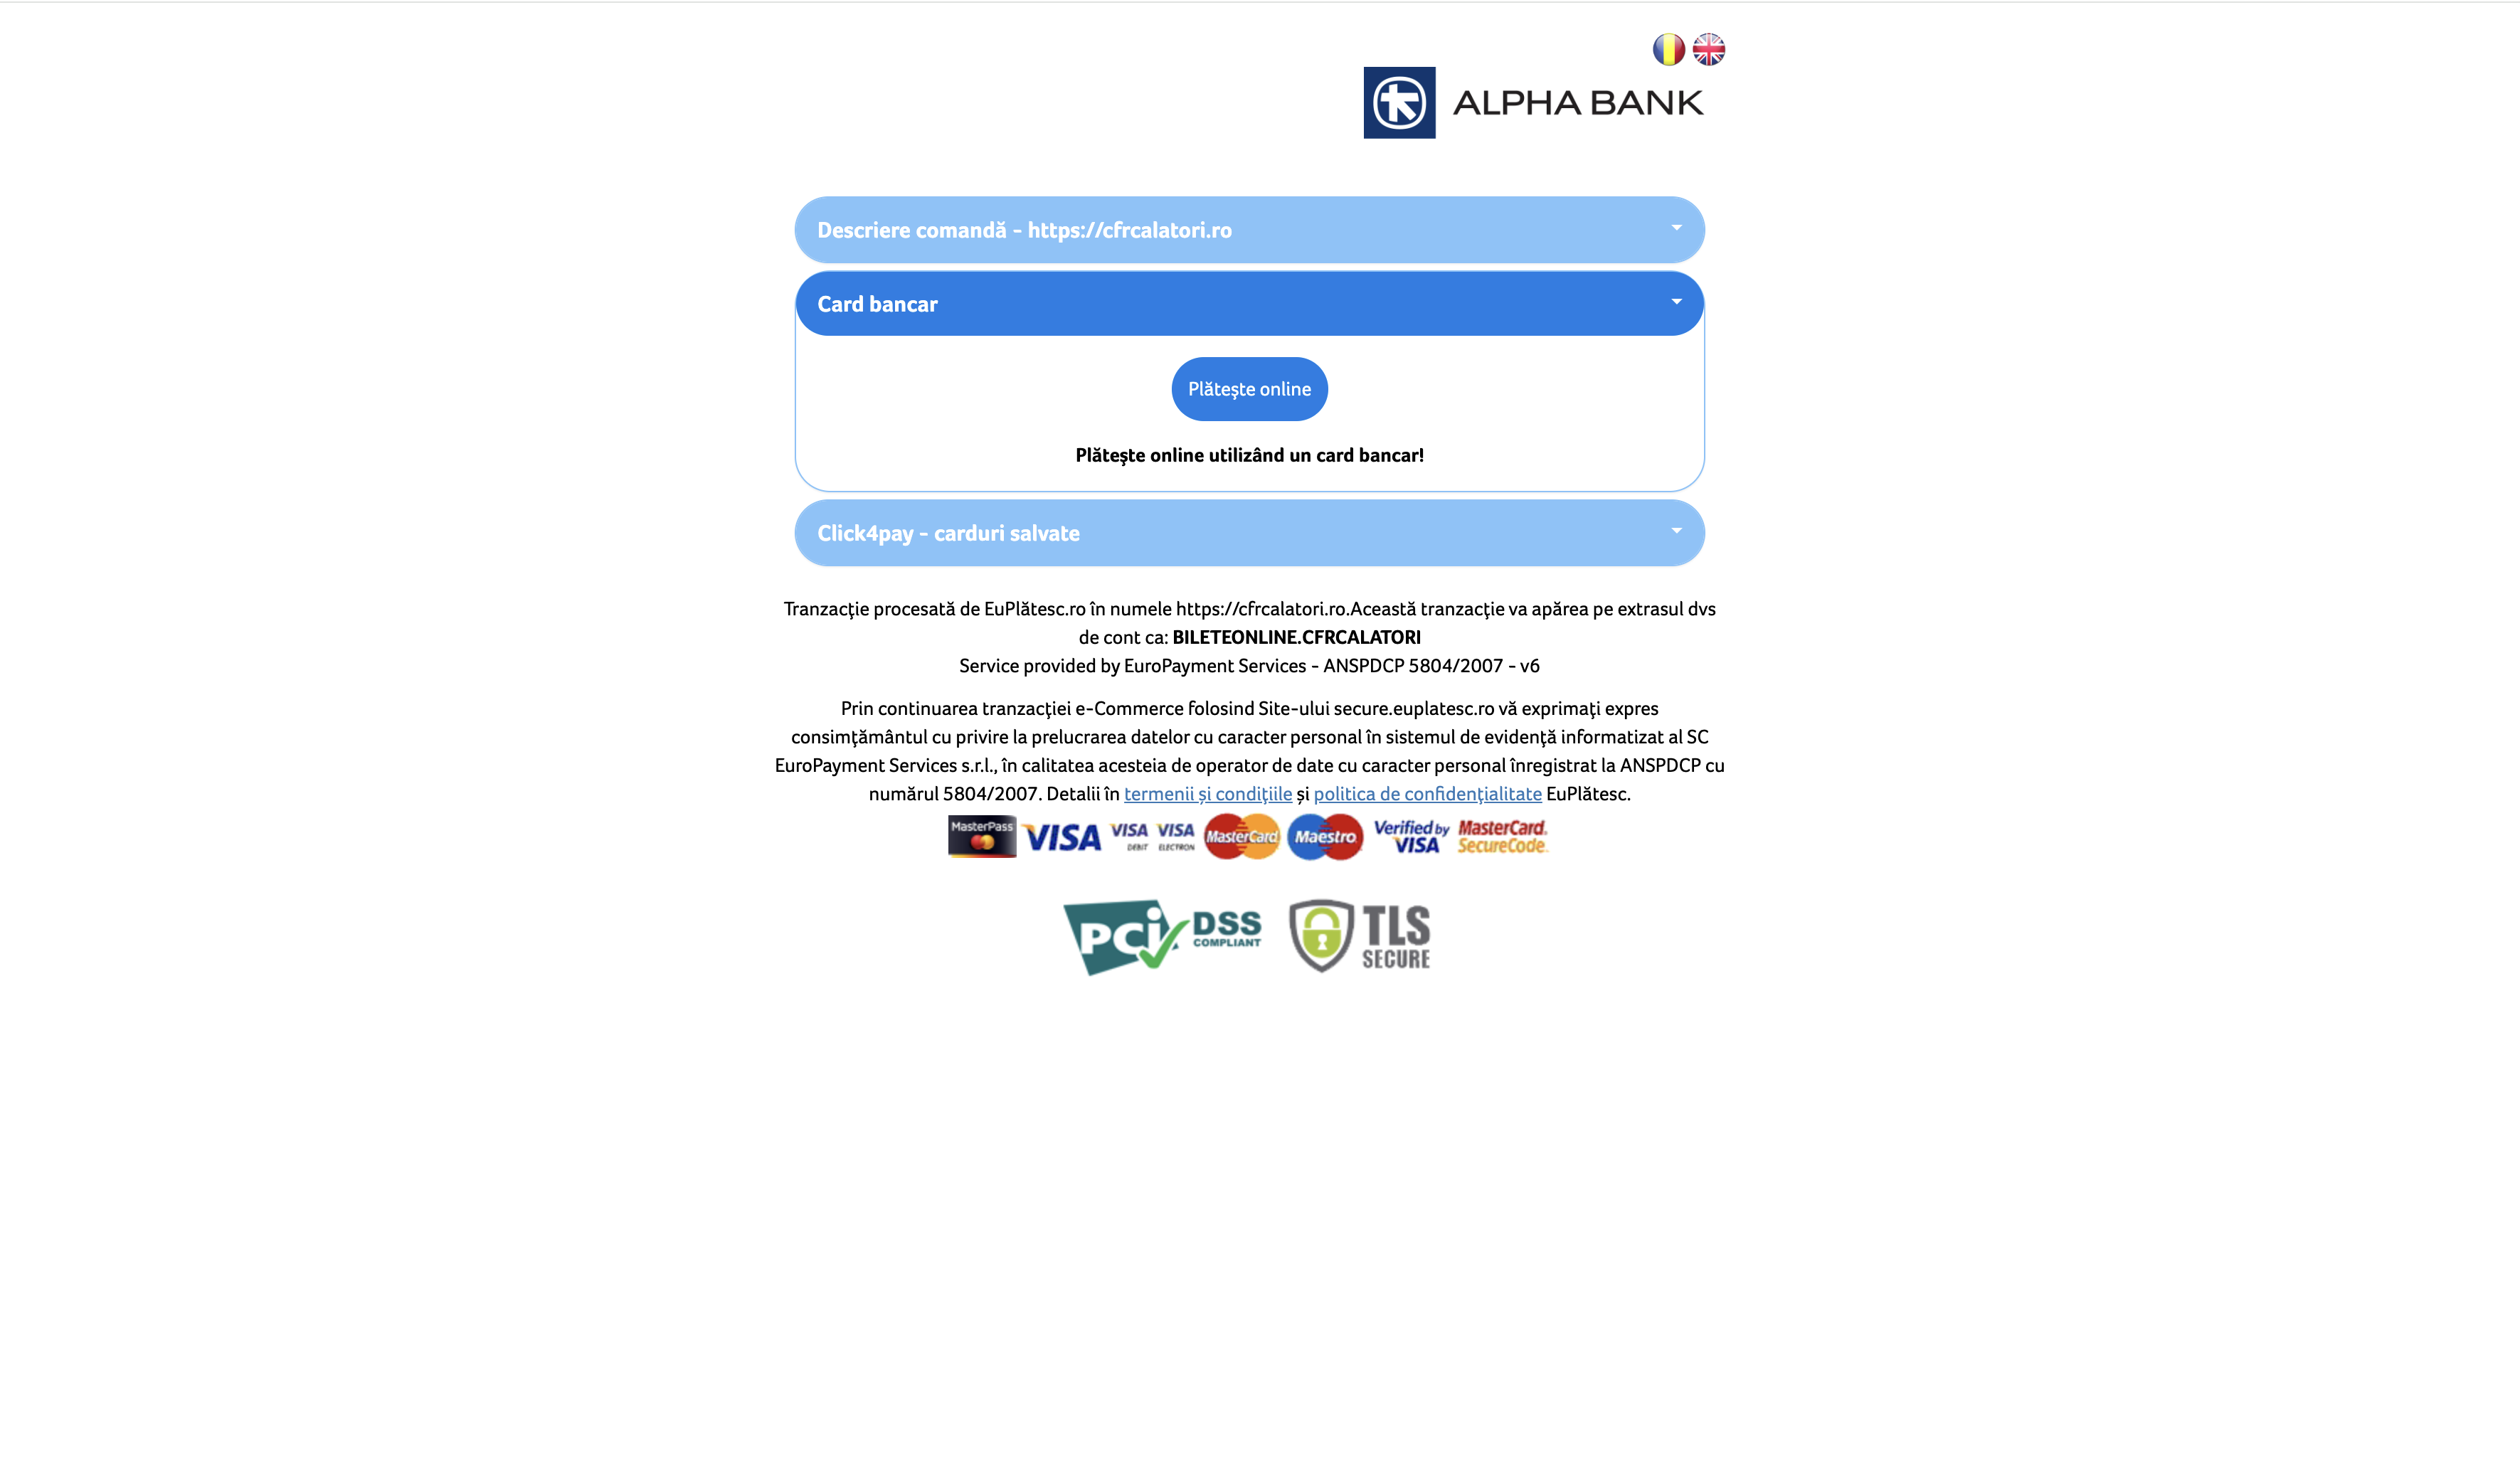
The payment is composed of 2 parts:
- Selecting to pay using an online credit card
- Filling the form with the card details
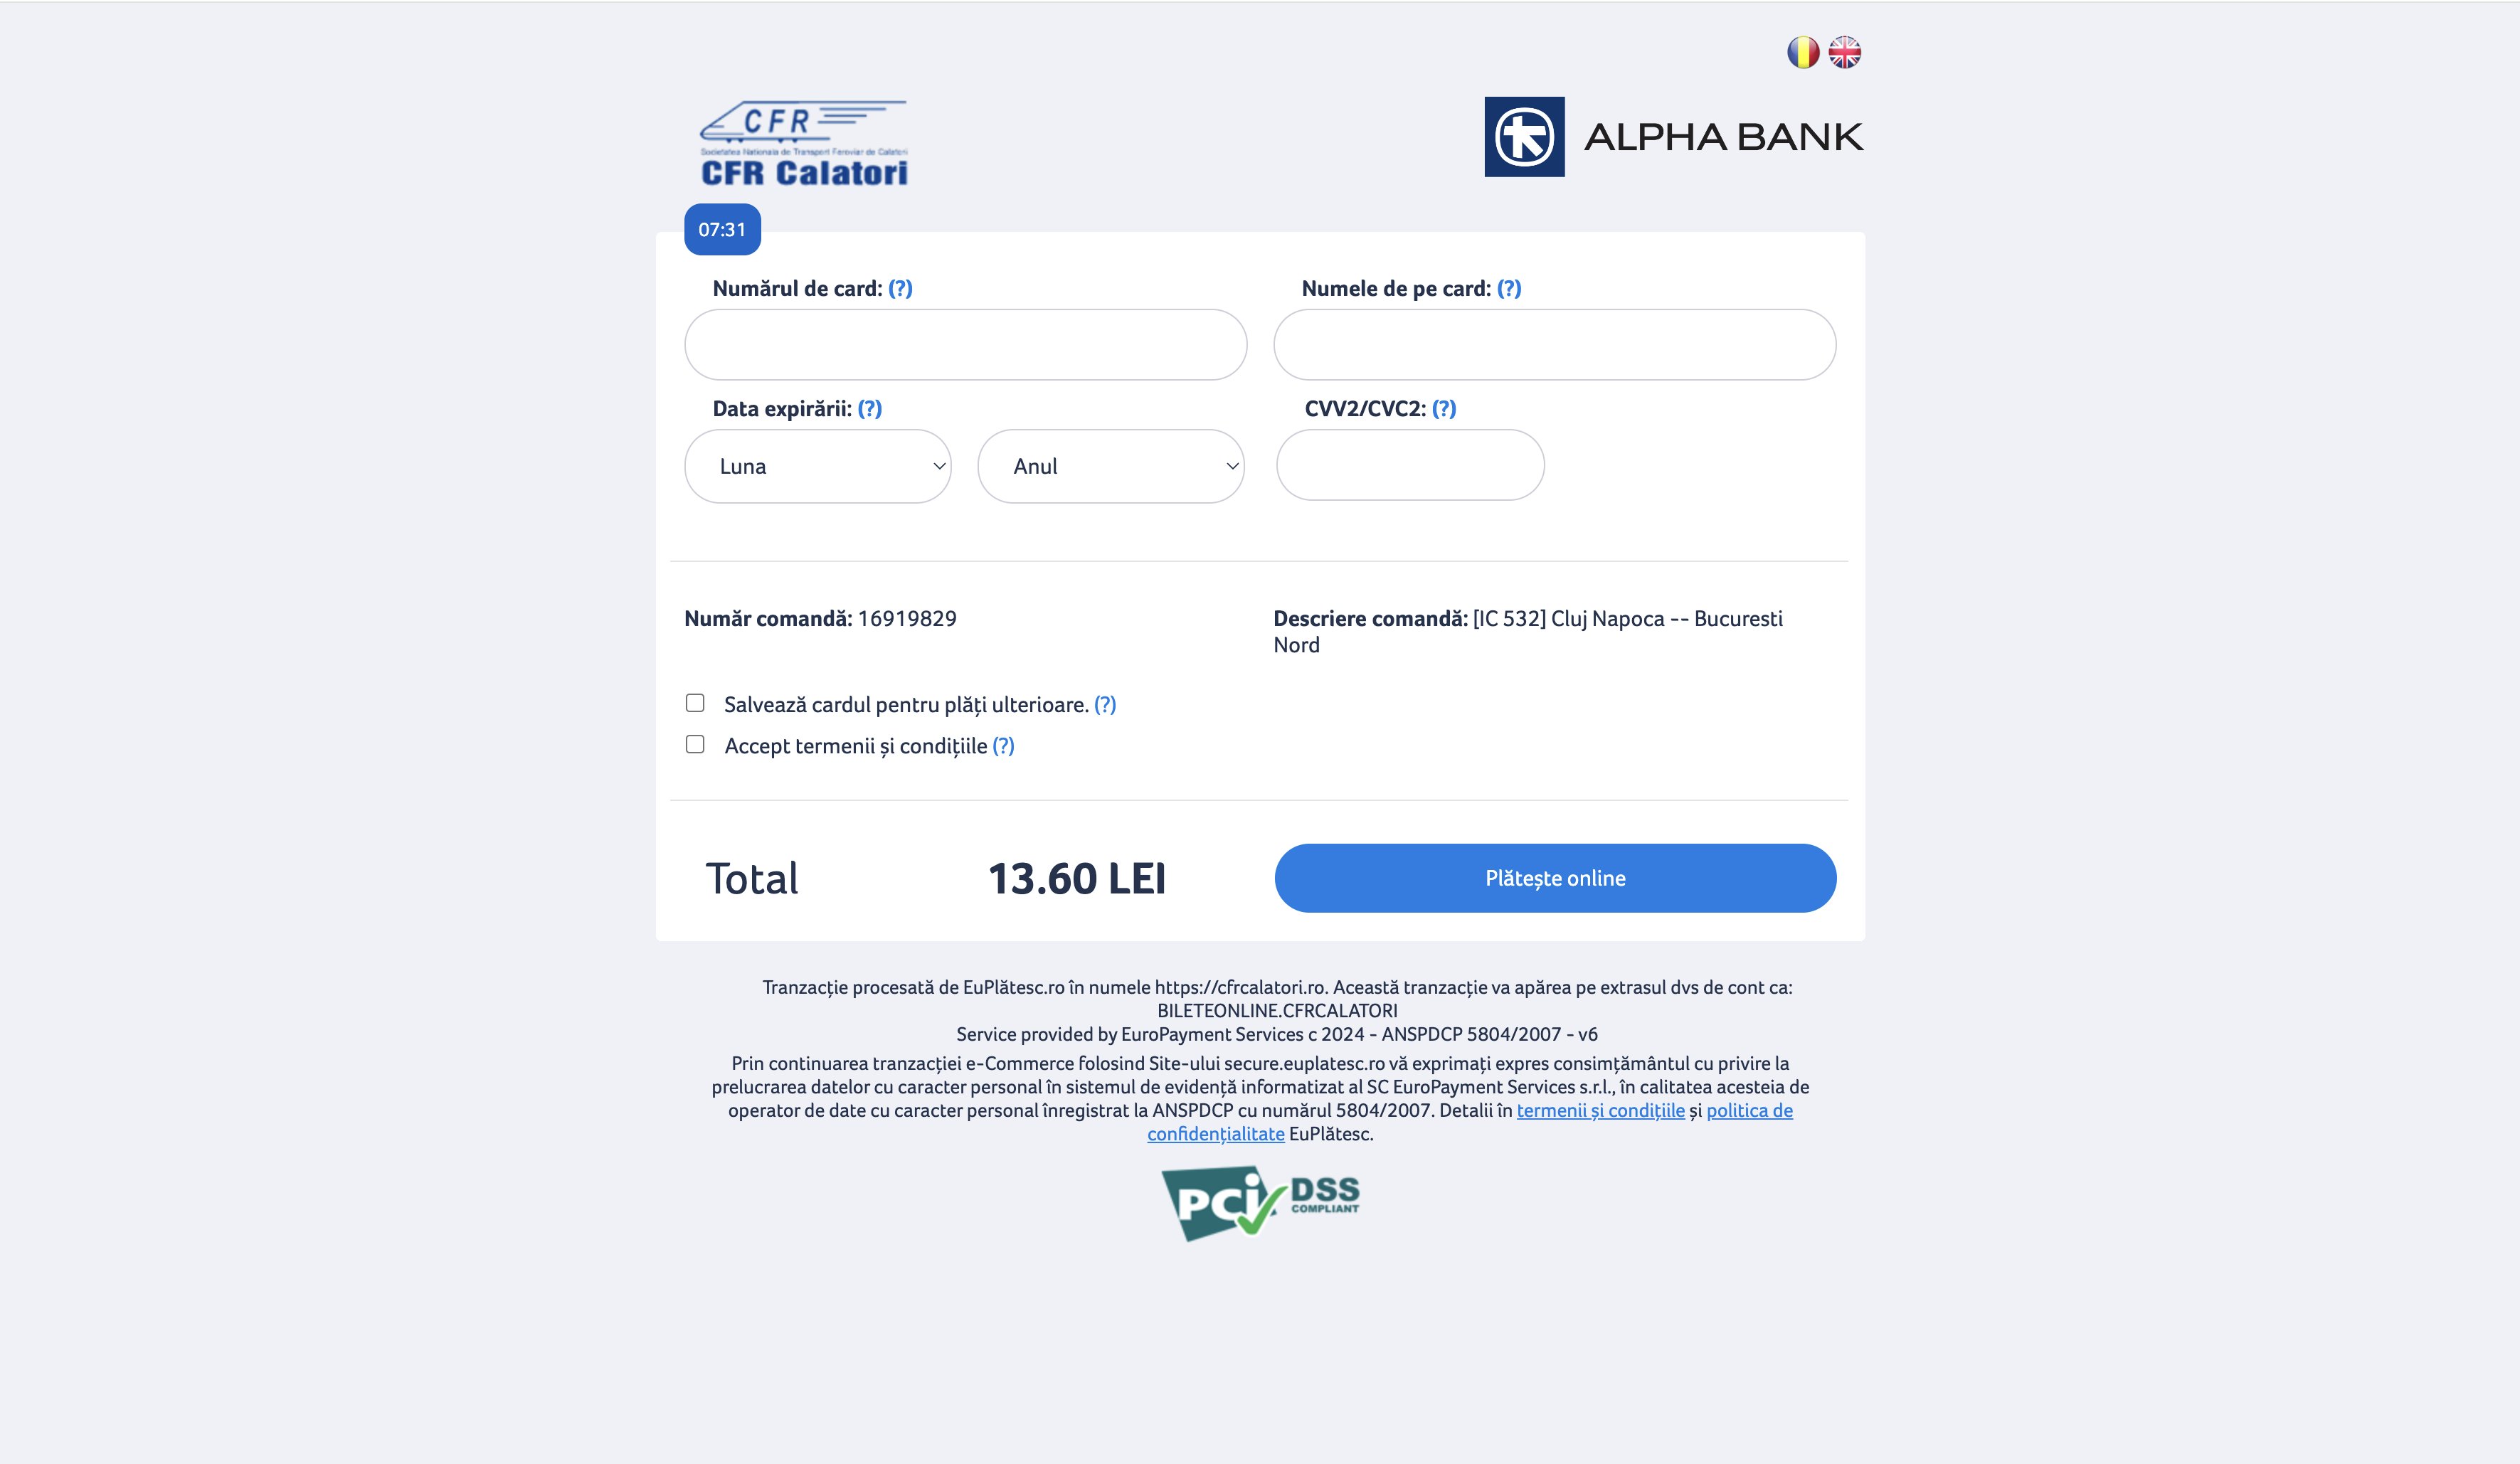
const USER_DETAILS = {
  // previous user details
  CARD_NUMBER: "1234 5678 1234 5678",
  CARD_PERSON: "John Doe",
  CARD_EXPIRATION_MONTH: "12",
  CARD_EXPIRATION_YEAR: "2024",
  CARD_CVV: "123",
};

const SELECTORS = {
  // previous selectors
  SELECT_CARD_PAYMENT: "",
  SELECT_PAY_ONLINE: "",
  CARD_NUMBER: "",
  CARD_NAME: "",
  CARD_EXPIRING_MONTH: "",
  CARD_EXPIRING_YEAR: "",
  CARD_CVV: "",
  CARD_CONSENT: "",
  CARD_PAY_ONLINE: "",
};

async function handlePayment(page) {
  await page.waitForSelector(SELECTORS.SELECT_CARD_PAYMENT);
  const selectCards = await page.$(SELECTORS.SELECT_CARD_PAYMENT);
  await selectCards.evaluate((el) => el.click());

  await page.waitForSelector(SELECTORS.SELECT_PAY_ONLINE);
  const selectPayOnline = await page.$(SELECTORS.SELECT_PAY_ONLINE);
  await selectPayOnline.evaluate((el) => el.click());

  await page.waitForSelector(SELECTORS.CARD_NUMBER);
  await page.type(SELECTORS.CARD_NUMBER, USER_DETAILS.CARD_NUMBER, {
    delay: 100,
  });
  await page.type(SELECTORS.CARD_NAME, USER_DETAILS.CARD_PERSON, {
    delay: 100,
  });
  await page.type(
    SELECTORS.CARD_EXPIRING_MONTH,
    USER_DETAILS.CARD_EXPIRATION_MONTH,
    { delay: 100 },
  );
  await page.type(
    SELECTORS.CARD_EXPIRING_YEAR,
    USER_DETAILS.CARD_EXPIRATION_YEAR,
    { delay: 100 },
  );
  await page.type(SELECTORS.CARD_CVV, USER_DETAILS.CARD_CVV, { delay: 100 });

  await page.waitForSelector(SELECTORS.CARD_CONSENT);
  const consent = await page.$(SELECTORS.CARD_CONSENT);
  await consent.evaluate((el) => el.click());

  await page.waitForSelector(SELECTORS.CARD_PAY_ONLINE);
  const payOnline = await page.$(SELECTORS.CARD_PAY_ONLINE);
  await payOnline.evaluate((el) => el.click());
}

async function run() {
  // previous code
  await handlePayment(page);
  await browser.close();
}
Congratulations! You have successfully automated the process of purchasing a train ticket using Puppeteer. You can now run the script and see the magic happen.
Confirm you are not a robot
Automations are great, but sometimes they can be too good, and be used for not-so-great purposes. Most of the browsers have mechanisms to detect if the user is a human or a robot. There are some libraries that can help you to bypass these mechanisms, but they are not recommended to be used in production environments.
Ghost Cursor
Remember the click action we saw in the previous chapter? While it's a great way to interact with the page, it's not the most human-like way to do it. The cursor literally teleports to the position and clicks. This is not how a human would interact with the page. Ghost Cursor is a library that simulates human-like cursor movements. It's a great way to make your automations more human-like.
How does it work
Bezier curves do almost all the work here. They let us create an infinite amount of curves between any 2 points we want and they look quite human-like.
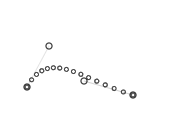
The magic comes from being able to set multiple points for the curve to go through. This is done by picking 2 coordinates randomly in a limited area above and under the curve.
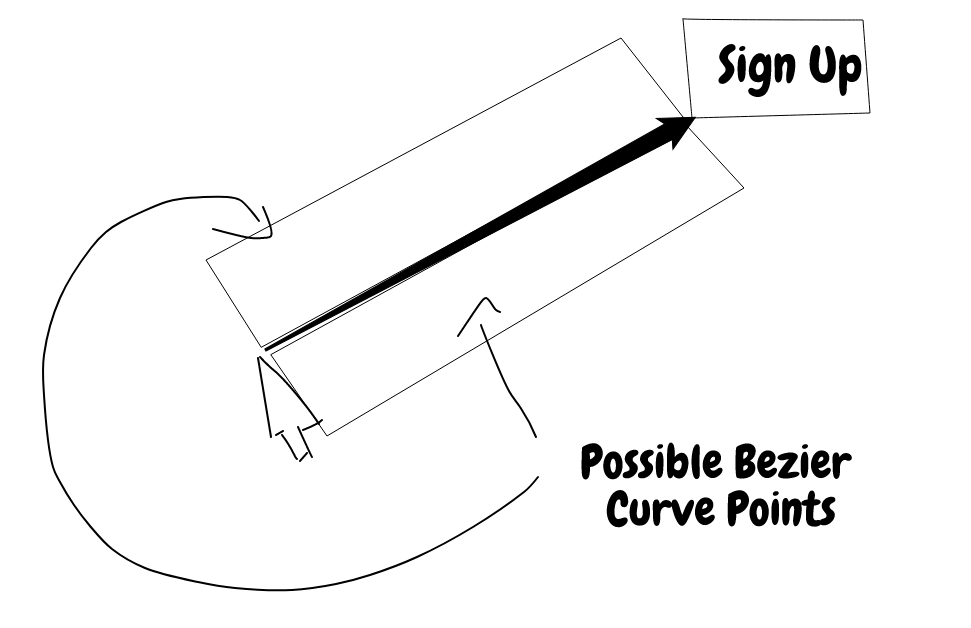
However, we don't want wonky looking cubic curves when using this method because nobody really moves their mouse that way, so only one side of the line is picked when generating random points.
 When calculating how fast the mouse should be moving we use Fitts's Law
to determine the amount of points we should be returning relative to the width of the element being clicked on and the distance
between the mouse and the object.
Setting up
To install Ghost Cursor, run the following command:
npm install ghost-cursor
Usage
We'll set up ghost cursor for our previous example. We'll use the same code as before, but we'll replace the page.click with cursor.click.
By default, the cursor is not visible. For making it visible, we can use the function cursor.installMouseHelper(). This is super useful for debugging purposes.
async function run() {
  const browser = await puppeteer.launch();
  const page = await browser.newPage();
  await page.goto("https://example.com");
  const cursor = ghostCursor.createCursor(
    page,
    await ghostCursor.getRandomPagePoint(page), // start in a random position
    true, // do random movements while moving
  );
  await ghostCursor.installMouseHelper(page);
}
To use it, we'll need to send it as a parameter to the functions, together with the page object. For example, the function for selecting the train station would look like this:
async function selectTrain(page, cursor) {
  await page.waitForSelector(SELECTORS.TRAIN_PANEL);

  const train = await page.$(SELECTORS.TRAIN_PANEL);

  await train.waitForSelector(SELECTORS.BUY_BUTTON);
  await delay(2000);

  const buyButton = await train.$(SELECTORS.BUY_BUTTON);
  await cursor.click(buyButton);
}